GANs for Face Aging problems — What does your face look like in the next few years?
Learn how to apply GANs to see face looks in face aging problem or in different conditions.

Introduction
Generative Adversarial Networks are a type of deep neural network architecture that uses unsupervised machine learning to generate data. They were introduced in 2014, in a paper by Ian Goodfellow, Yoshua Bengio, and Aaron Courville, which can be found at the following link: https://arxiv.org/pdf/1406.2661. GANs have many applications, including image generation and drug development.
This blog will introduce you to the core components of GANs. It will take you through how each component works and the important concepts and technology behind GANs. It will also give you a brief overview of the benefits and drawbacks of using GANs and an insight into certain real-world applications. After understanding GAN architecture, we will see how GANs are applied in face aging problem.

What is a GAN?
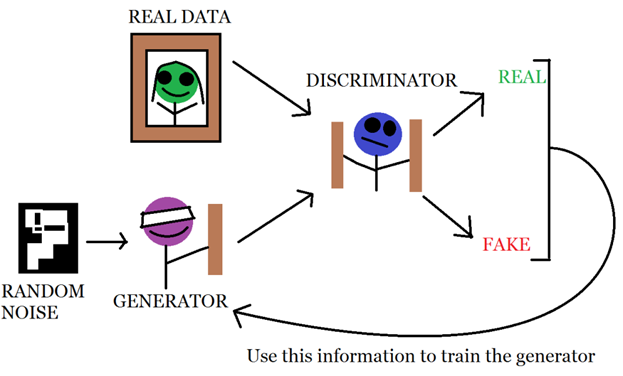
A GAN is a deep neural network architecture made up of two networks, a generator network and a discriminator network. Through multiple cycles of generation and discrimination, both networks train each other, while simultaneously trying to outwit each other.
Their goal is to generate data points that are magically similar to some of the data points in the training set.
Currently, people use GAN to generate various features. It can generate realistic images, 3D-models, videos, and a lot more.

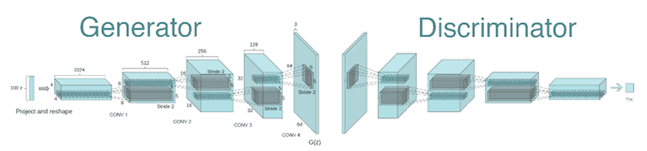
Firstly, let’s take a look in general GANs model.

What is a generator network?
A generator network uses existing data to generate new data. It can, for example, use existing images to generate new images. The generator’s primary goal is to generate data (such as images, video, audio, or text) from a randomly generated vector of numbers, called a latent space. While creating a generator network, we need to specify the goal of the network. This might be image generation, text generation, audio generation, video generation, and so on.
What is a discriminator network?
The discriminator network tries to differentiate between the real data and the data generated by the generator network. The discriminator network tries to put the incoming data into predefined categories. It can either perform multi-class classification or binary classification. Generally, in GANs binary classification is performed.
Training through adversarial play in GANs
In a GAN, the networks are trained through adversarial play: both networks compete against each other. As an example, let’s assume that we want the GAN to create forgeries of artworks:
- The first network, the generator, has never seen the real artwork but is trying to create an artwork that looks like the real thing.
- The second network, the discriminator, tries to identify whether an artwork is real or fake.
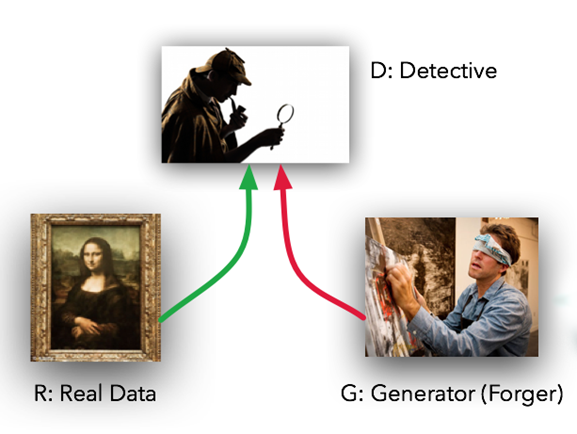
The generator, in turn, tries to fool the discriminator into thinking that its fakes are the real deal by creating more realistic artwork over multiple iterations.
The discriminator tries to outwit the generator by continuing to refine its own criteria for determining a fake.
They guide each other by providing feedback from the successful changes they make in their own process in each iteration.
Ultimately, the discriminator trains the generator to the point at which it can no longer determine which artwork is real and which is fake.
How to implement GANs in face aging problem
This is an instruction about how to implement Face-Aging using GAN. Implement GANs is a little difficult.
All codes are executed in TensorFlow 1.12 and CuDA 9.0. We recommend you to run in a Python environment.
Install Cuda 9.0 (this can take a few minutes)
$wget https://developer.nvidia.com/compute/cuda/9.0/Prod/local_installers/cuda-repo-ubuntu1604-9-0-local_9.0.176-1_amd64-deb$dpkg -i cuda-repo-ubuntu1604-9-0-local_9.0.176-1_amd64-deb$apt-key add /var/cuda-repo-9-0-local/7fa2af80.pub$apt-get update$apt-get install cuda=9.0.176-1
To install TensorFlow, run command below in terminal:
pip install --upgrade tensorflow-gpu==1.12.2Clone this repo:
git clone https://github.com/pbaylies/stylegan-encoder\cd stylegan-encoder
Setting up folder structure for our images:
rm -rf aligned_images raw_imagesmkdir aligned_images raw_images
Prepare images for training
Put your images wanted to be changed into the folder raw_images, data structure would be like this:
├── ./raw_images
│   ├── [your images shoule be here]
│   ├── [your images should be here]
Auto-Align faces
Run the script:
python align_images.py raw_images/ aligned_images/ --output_size=1024This script will:
- Look for faces in the images
- Crop out the faces from the images
- Align the faces
- Rescale the resulting images and save them in “aligned_images” folder
Encoding faces into StyleGAN latent space
$gdown https://drive.google.com/uc?id=1aT59NFy9-bNyXjDuZOTMl0qX0jmZc6Zb$mkdir data$mv finetuned_resnet.h5 data$rm -rf generated_images latent_representations
Train latent encode
$python encode_images.py --optimizer=adam --lr=0.002 --decay_rate=0.95 --decay_steps=6 --use_l1_penalty=0.3 --face_mask=True --iterations=500 --early_stopping=False --early_stopping_threshold=0.05 --average_best_loss=0.5 --use_lpips_loss=0 --use_discriminator_loss=0 --output_video=True aligned_images/ generated_images/ latent_representations/Access to this https://drive.google.com/drive/u/1/folders/1exoCSLE-CRmfr9yqW3Yv4M9YI7VAw1LZ and download these pre-trained files:
Put these files in the same folder.
Save outout_vectors.npy into latent_representations by script.
$python save_latent.pyEdit the file save_latent.py to define out_file parameter to get the destination of latent.
Implement Aging-face progress
In the root folder, execute:
$git clone https://github.com/tr1pzz/InterFaceGAN.git$cd InterFaceGAN/$gdown https://drive.google.com/uc?id=1MEGjdvVpUsu1jB4zrXZN7Y4kBBOzizDQ$mv karras2019stylegan-ffhq-1024x1024.pkl InterFaceGAN/models/pretrain/karras2019stylegan-ffhq-1024x1024.pkl
Testing
Load output_vector.npy into final_w_vectors.
Run this command to use this final_w_vectors to generate images.
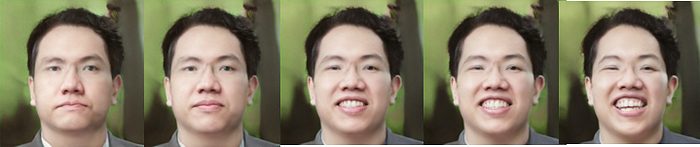
python test_age.pyThe results as below:


Read original and latest article at:
https://www.neurond.com/blog/gans-face-aging-problems-try-it-with-your-face
NeurondAI is a transformation business. Contact us at:
Website: https://www.neurond.com/